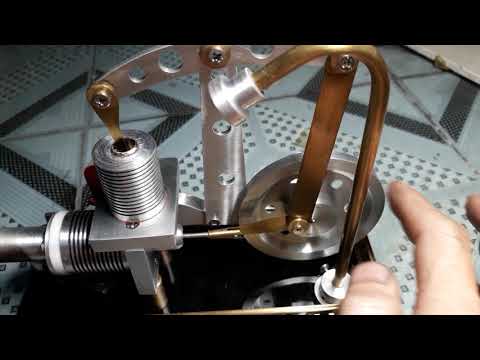
Another Adventure in Hot Air

Started by PaulR · 76 replies · 3,423 views

PaulR
Reply #30 · 4 Oct 2026, 14:49
Quote from: internal_fire* An aggressive flux is needed. Typically something like zinc chloride (Ruby Fluid is one brand). Electronic solder with a rosin core will usually not work.

Thanks Gene  :ThumbsUp:. I used an off-the-shelf plumbing flux paste and I think that was most likely the problem (the parts were stripped back to bare metal and cleaned with meths beforehand). Although these are probably two different steels which I though might be another issue, I recall having a similar problem trying to soft solder two pieces of identical mild steel in the past using this same flux.
PaulR
Reply #31 · 4 Oct 2026, 18:34
Painted the tank and made the two connecting rods from 1.5mm aluminium (sawn from square tube of old garden furniture  :Lol:). Assembled with some temp fasteners in place of crank pins just to check I've got the measurements right and it seems ok. Apart from the crank pins I still need to make those fiddly little 1mm thick washers/spacers or admit defeat and buy some.

Despite my best efforts, I can feel some friction when the piston is near TDC, nothing major and it might even disappear with a bit of manual spinning.
Log in to see this image
redhouseluv
Reply #32 · 4 Oct 2026, 19:41
Getting close ................ looking forward to see a test.

I was reading the list of Stirling Engine tips you sent me a while ago with the 'do's and dont's' - I think physics has told us, 'NO' friction is unachievable; as minimum an amount of friction as possible is definitely the goal!  ;D
Last edit: 4 Oct 2026, 19:47 by Sanjay F
PaulR
Reply #33 · 5 Oct 2026, 13:37
Decided to test how waterproof the tank and jacket are. I thought it wasn't too bad, with just a tiny leak on top of the jacket which some JB Weld will fix but when I gave the engine a spin by hand a few drops of water appeared at the far end of the displacer cylinder!!!  :insane: That's really two issues... firstly it's leaking and secondly there obviously shouldn't be any water in there. I thought I'd checked that the hot cap was airtight before soldering on the parts making up jacket and the connecting flange but obviously not carefully enough. So, I've resoldered that end and now everything seems to be sealed.

As to how the water was getting into the displacer chamber, that was confusing. I disassembled things so I could play the displacer assembly like some bizarre instrument - half filled the jacket with water, covered one hole with a finger and blew into the other inlet tube while trying to look at the joints with a magnifier! Anyway, I think I've tracked it down to a miniscule gap between the flange and the displacer tube. As it's at the cold end, I think a bit of JB Weld with do to seal that as well; I didn't fancy soldering that and risk upsetting the various soldered parts and burning off the paintwork. I'll see what happens tomorrow.
redhouseluv
Reply #34 · 5 Oct 2026, 15:32
Quote from: PaulRDecided to test how waterproof the tank and jacket are. I thought it wasn't too bad, with just a tiny leak on top of the jacket which some JB Weld will fix but when I gave the engine a spin by hand a few drops of water appeared at the far end of the displacer cylinder!!!  :insane: That's really two issues... firstly it's leaking and secondly there obviously shouldn't be any water in there. I thought I'd checked that the hot cap was airtight before soldering on the parts making up jacket and the connecting flange but obviously not carefully enough. So, I've resoldered that end and now everything seems to be sealed.

As to how the water was getting into the displacer chamber, that was confusing. I disassembled things so I could play the displacer assembly like some bizarre instrument - half filled the jacket with water, covered one hole with a finger and blew into the other inlet tube while trying to look at the joints with a magnifier! Anyway, I think I've tracked it down to a miniscule gap between the flange and the displacer tube. As it's at the cold end, I think a bit of JB Weld with do to seal that as well; I didn't fancy soldering that and risk upsetting the various soldered parts and burning off the paintwork. I'll see what happens tomorrow.


Can you not use blue gunk (hylomar) to seal the water leaks - sounds like a similar problem to the one I had with that last stirling restoration, water getting into the displacement cylinder  :( ::)

Hope you find and resolve the leaks!  :popcorn: :ThumbsUp:
PaulR
Reply #35 · 5 Oct 2026, 17:22
Quote from: Sanjay FCan you not use blue gunk (hylomar) to seal the water leaks -

Probably... if I had some  :Lol: The leak appears to be from a tiny gap, maybe 0.1mm over a length of about 3mm so anything would probably work  ;D
PaulR
Reply #36 · 9 Oct 2026, 19:15
Still soldiering on with this one... I've tried running it with a meths burner quite a few times over the last few days but no joy. At least I can see the water is circulating as planned even if the engine isn't  :lolb:

So, I bored out more of the piston to reduce its weight and had to make a new wrist pin as a result. I put some holes in the flywheel to reduce weight nearest the shaft. I'm still getting a little leak from somewhere around the water jacket but at least it's not finding its way inside the displacer cylinder any more. Cut a Flexoid gasket to go between displacer and frame and just finished making a new displacer (and rod) from aluminium (ex garden furniture again!) to reduce weight but trying out end caps fixed with Loctite which is currently curing. Did some more running-in using a rubber wheel on a Dremel type tool held against the flywheel. Unless there's an air leak I haven't found I think I've exhausted all the options. Its certainly not a temperature issue this time, the cold end is barely warm after having the burner on for 15-20 mins. Maybe there's still too much friction in the bearings...No photos I'm afraid.
redhouseluv
Reply #37 · 9 Oct 2026, 19:23
You're working your way through various options and eliminating them one by one, hopefully it bursts into life soon  :popcorn: :ThumbsUp:
Minh Thanh
Reply #38 · 10 Oct 2026, 03:43
Give this a try:

https://www.youtube.com/watch?v=efX43eWwl9MYouTube video

If your engine does not perform as shown in the video (where the flywheel reacts to the airtightness), there are two possible reasons:
- Airtightness: insufficient.
- Friction: There's a bit too much friction.
If the engine meets these criteria, we will then consider other factors.
PaulR
Reply #39 · 10 Oct 2026, 07:18
Quote from: Minh ThanhGive this a try:


If your engine does not perform as shown in the video (where the flywheel reacts to the airtightness), there are two possible reasons:
- Airtightness: insufficient.
- Friction: There's a bit too much friction.
If the engine meets these criteria, we will then consider other factors.

I've been looking for any sign of 'bounce back' but haven't really seen it yet. I disconnected the piston rod so I could move it in and out by hand and it seems has good suction when pulled which seems to suggest it's pretty airtight.

Maybe it's an issue with the piston rod. It can move left to right on the wrist pin and there's some left/right slack at the crank end. If I tighten the crank pin completely the side of the rod will rub against the crank disk. I could put a thin 'thrust washer' between them I suppose. Thanks for the help again  :ThumbsUp:
Minh Thanh
Reply #40 · 10 Oct 2026, 08:33
More :
Remove the power piston and spin the flywheel vigorously; it should rotate for about 10 revolutions (the more, the better).
- This indicates that the crankshaft and its bearings are run smoothly, the displacer and its bearings are moving freely, and the displacer is not colliding with the hot cap or the front and rear sections.
- Observe the flywheel's rotation to identify potential sources of friction, binding, or not smooth.

 
Quote from: PaulR
I've been looking for any sign of 'bounce back' but haven't really seen it yet. I disconnected the piston rod so I could move it in and out by hand and it seems has good suction when pulled which seems to suggest it's pretty airtight.


    It is also possible that your power piston is slightly oversized.
Resolve issues related to friction, binding, or lack of smooth movement.
Once those issues are resolved, next on the power piston ; use 600-grit sandpaper to gradually refine it until it moves as smoothly as possible within the cylinder.

  All factors affect the "bounce-back" result; therefore :
--Resolve issues such as friction, binding, or lack of smooth movement before considering the power piston.

Last edit: 10 Oct 2026, 08:51 by Minh Thanh
PaulR
Reply #41 · 10 Oct 2026, 09:05
I just reassembled with the new lighter displacer and we have some bounce back.

https://youtu.be/GzEm73CFkIcYouTube video

I don't think I'm getting anything like 10 revolutions when spinning the disconnected flywheel by hand, probably in the region of four or five. I think that will improve if I run it in further using the rotary tool to spin it - it takes ages to wind down when I take the tool away and has improved over time.

I've checked that there's no collision of the displacer with the old one and the new.

As I mentioned, I'm pretty sure the piston is running as smooth as I can make it, I think the remaining issue is probably in the bearings. I'll try to give it a run on meths later, see what happens.
Minh Thanh
Reply #42 · 10 Oct 2026, 09:17
Quote from: PaulRI just reassembled with the new lighter displacer and we have some bounce back.

https://youtu.be/GzEm73CFkIc

I don't think I'm getting anything like 10 revolutions when spinning the disconnected flywheel by hand, probably in the region of four or five. I think that will improve if I run it in further using the rotary tool to spin it - it takes ages to wind down when I take the tool away and has improved over time.

I've checked that there's no collision of the displacer with the old one and the new.

As I mentioned, I'm pretty sure the piston is running as smooth as I can make it, I think the remaining issue is probably in the bearings. I'll try to give it a run on meths later, see what happens.


The displacer is lighter—the lighter, the better for this type of engine. :ThumbsUp: :ThumbsUp:
The results are quite good  :ThumbsUp:
Minh Thanh
Reply #43 · 10 Oct 2026, 09:25
Quote from: PaulRI just reassembled with the new lighter displacer and we have some bounce back.


I don't think I'm getting anything like 10 revolutions when spinning the disconnected flywheel by hand, probably in the region of four or five.


Do you mean just the flywheel and its shaft ?? No other components are connected.
Last edit: 10 Oct 2026, 09:29 by Minh Thanh
PaulR
Reply #44 · 10 Oct 2026, 12:25
Quote from: Minh Thanh Do you mean just the flywheel and its shaft ?? No other components are connected.

Yes but it's hard to count the number of revolutions by eye!

I gave it a run and it just started to turn over then suddenly stopped. I suspected a problem with the displacer and sure enough found that it had come apart at the end where the rod is attached. So that answers the question as to whether or not Loctite can withstand the temperatures involved. Since it can't be soldered I need to try your method of crimping - I'll take another look at your description earlier in the thread.

Quick reply

Log in to reply.